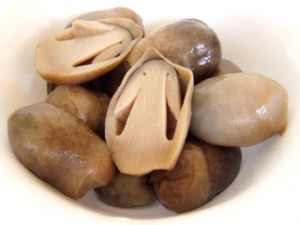
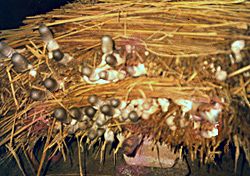
 Straw Mushroom (Volvariella volvacea) also known as paddy straw mushroom is a type of edible mushroom found widely distributed throughout Asia. The thumb sized mushrooms are heavily cultivated for food and export in Asia, and can be found in canned and dried forms and used extensively in Asian cuisines.
The Straw Mushroom has a delicate, musty, slightly earthy flavor which is quite appealing to some consumers. It takes well to inclusion in stir fries, soups, and stuffing, and retains both shape and flavor through cooking. It figures most prominently in Asian cuisine, and many Westerners are familiar with the shape and taste thanks to a proliferation of Asian-themed restaurants around the world. It can also be included in cuisine from other nations for an unusual injection of flavor and texture.
When mature for eating, a Straw Mushroom is distinguished by its pale pink gills and white spore print. The mushrooms have long white stems with bulbous bases, and drooping yellow to brown caps with a partial veil.
The fast-growing mushrooms are good source of delicious food with high nutritional attributes like proteins, essential amino acids, fats, vitamins, carbohydrates and fibers, and some have medicinal values as well. The art of mushroom propagation has advanced dramatically in the past decades due to the techniques of spawn preparation, wide selection of low cost materials and availability of agro-industrial wastes used as growing substrates.
Production of Straw Mushroom
Preparation of Potato-Dextrose-Agar (PDA)
Raw Materials:
- 200 g Fresh good quality potatoes
- 20 g Dextrose powder
- 20 g Agar bar (gulaman)
- 1 L Distilled water
Procedure:
- Wash, peel and dice the potatoes. Place 200 g in a casserole where water has started to boil and allow to boil until potatoes are soft enough for the pallate.
- Strain the broth (decoction) through cheesecloth. Restore the volume of decoction to 1 L and put back into the casserole.
- Add the agar (chipped) and the dextrose powder. Heat while stirring occasionally until the agar dissolves.
- Dispense 30 mL in each flat rhum bottle and plug the mouth with the bottle cotton.
- Sterilize the medium in a pressure cooker at 121°C or 15-lb. pressure for 15 minutes. Immediately after sterilization, slant the test tubes at an angle of 20 to 25 degrees, making sure that the agar does not touch the cotton plug.
- Lay the bottles flat on the table until the agar congeals.
Isolation of the Pure Culture (by Tissue Culture Method)
Tissue Culture Method (Volvariella volvaceae)
- Select a good, young, healthy and fresh mushroom (button stage for straw mushroom). Disinfect with 70% rubbing alcohol using a cotton swab.
- Cut vertically and horizontally half portion of the button stage mushroom.
- With a sterilized scalpel, cut approximately 1- cm cube to the tissue between the cap and stem and place on the middle of the plated agar.
- Incubate for 5 to 7 days at ordinary temperature. This is termed as pure tissue culture.
- Transfer the pure culture into agar slants.
- Incubate for 5 to 7 days at ordinary temperature. This is now termed as sub-culture.
Preparation of Spawn Substrates
- 1. Place chopped dried substrate; i.e., rice straw, banana, leguminous leaves in a suitable container and add water until completely submerged. Place something heavy on top to avoid flotation.
- 2. Ferment substrate anaerobically in water with urea (3 grams per gallon of water) as follows:
- chopped, dried tobacco midribs – 3 days
- chopped, dried kakawati leaves – 5 days
- chopped, dried ipil-ipil leaves – 5 days
- chopped, dried rice straw – 3 days
- chopped, dried water lily – 2 days
- chopped, dried banana leaves – 3 days
- 3. Wash the substrate with tap water three times or until objectionable odor is removed.
- 4. Mix with sawdust at a proportion of two parts substrate to one (2:1) part sawdust.
- 5. Add rice bran (Class A) at 20% of the major substrate.
- 6. Readjust the moisture at 65% to 70% (damp moisture).
- 7. Place substrates in polypropylene bags (PP) and 500 g/bag. Use 6×10 PP bags and pull-end of the bag, pass thru a PVC pipe ring (1” long x 1” diameter) Plug with used cotton, cover with scratch paper and tie with a rubber band.
- 8. Sterilize at 15-lb. pressure for 1 to 1½ hours or steam for 4 hours in a drum.
- 9. Cool, inoculate with pure culture.
Inoculation of the Spawn
- Sterilize the inoculating needle in the flame of an alcohol lamp.Lift from the inoculum about 1.5 cm² and transfer into the bagged substrate.
- Flame the lip of the bag as well as the lip of the rhum bottle containing the inoculum before lifting a portion for transfer.
- The inoculum substrate is now termed spawn and is ready for planting into beds after two weeks.

Backyard Planting of Straw Mushroom
Materials:
- Mushroom spawn of good quality
- Bedding materials (rice straw/banana leaves)
- Urea ( fertilizer)
- Plastic sheet (5m/3 m bed)
- Soaking vessels
- Benlate (fungicide)
Procedure:
- Gather good quality substrates (dried rice straw and dried banana leaves).
- Arrange the substrates, bundle with plastic straw in the middle to about 4” diameter. Have the substrate cut to 18” length.
- Soak the bundled substrates in clean, tap water for a considerable period of time. Rice straw requires 3-4 hours soaking while banana leaves require 10-12 hours soaking. This procedure renders the substrate pliable. It allows sufficient water supply required for the growth of mold during its incubation period. Do not oversoak the material.
- While the material is being soaked, prepare the bed foundation. This could either be made of soil, wood or concrete. Most economical and practical is soil foundation. This is done by making a foundation similar to a garden plot which should be east-west oriented under a partially shaded area.
- Prepare the fertilized paper (old newspaper) soaked in 3g urea/gal of water for 10-20 minutes.
- After the completion of the required soaking period, haul the materials from the soaking vessel and allow excess water to drain freely.
- Lay the substrates on the bed foundation and make up 3 to 4 layers during the dry season and 5 to 7 layers during the rainy season. Make the first layer by closely laying enough soaked substrates side by side until the whole length of the plot is covered.
- Distribute pieces of half-squeezed fertilized paper only along the edges of the laid substrates.
- Distribute spawn (300 g) to the layers of a 3-m bed. Place a thumb-sized spawn on the top of each piece of distributed fertilized paper. Keep a 2-3” distance between spawns.
- Repeat the preceding procedure as you make the second, third and succeeding layers.
- Cover the entire bed with plastic sheet to assure temperature build-up and to retain the moisture required for the mushroom mold to ramify. This should be left intact for 5 days (dry season) or 7 days or more, depending on the existing climatic conditions (cool, rainy months).
- Aerate the bed on the 5th or 7th day after the incubation period by removing the plastic cover. This will allow the release of toxic gases which may affect the growth of mushroom. In cases of storm, heavy rain or too windy a place, raising the plastic sheet for less than an hour in the morning is sufficient.
- Return the plastic sheet cover, but never allow this to touch the pinheads to avoid spoilage of mushroom.
Care and Management
High yielding mushroom beds depend on three interrelated factors: good quality spawns, preparation of bed and care and management. More tips follow:
- Keep the surrounding clean.
- Keep the bed moist if necessary. Do this by spraying with clean water making sure that it does not exert pressure to avoid breaking the thread-like structures spreading on the substrates.
- DO NOT WATER THE BEDS WHEN PINHEADS APPEAR. This will give way to early decomposition of fruits.
- Picking up mushrooms would be realized on the 14th and 21st day depending on the prevailing environmental conditions. When picking/harvesting, do not use any sharp tools to remove the fruit from the substrate. Hold the base of the mushroom with bare hands and apply a simple twisting motion.
- In case the bed is infected with other kinds of molds or infested with insects, take the harvestable mushroom before applying the prescribed fungicide/insecticide and do this by spot spraying.
- Maintain the temperature of the bed at 32° to 35°C during the fruiting. No mushroom will fruit if temperature drops to 20°C. Mushrooms grown at higher temperature will be smaller and lighter in weight.
- After a lapse of one month, discard used substrates (spent bed).
Source: mis.dost.gov.ph; Photos: www.khiewchanta.com and ouat.ac.in